Tutorial: Parameterized Test Case "Create Hero"
Estimated reading time: 20 minutes
Often, applications under test require multiple user inputs, which may lead to different expectations regarding its outputs. While it is usually neither practical nor necessary to comprehensively test every possible permutation of inputs, it does make sense to at least cover common, edge, and error cases representative of the whole set of possible inputs. For these kinds of tests, the basic testing scenario remains the same – only the inputs and expected outputs change. Instead of having to create separate tests for each case, the Test-Editor provides parameterized testing as a means to define a single test case that defines the common test procedure, and have it executed for multiple sets of data.
Note that this is an advanced tutorial. It builds on the introductory tutorials that guide you through creating test specifications and creating test cases.
How do I write parameterized test cases?
For this example, the test case created in the previous tutorial will be extended to a parameterized test. Therefore, the software under test continues to be the Angular “Tour of Heroes”-Tutorial.
Modifying the Specification
To start with, we create a new test specification, modified from the one created in the corresponding tutorial. Given you have a running instance of the Test-Editor (see here), you can navigate and select to the CreateHero.tsl file in the test navigator, click the copy button, select the heroes folder, and click the paste button. Rename the duplicated file to CreateHero_parameterized.tsl (for example; parameterized tests and their specifications can be named arbitrarily and do not have to adhere to any particular naming convention) and open it for editing. Change the specification to something like this:
        * Given: I am on the heroes page
        * When: I create a hero
        * Then: That hero should be the last one of the list
As can be seen, the specification remains almost the same – we have only removed the reference to a concrete hero name: previously, we specified a hero named “Sancho” to be created. Now, our specification is more generic, as it should be valid for arbitrary hero names. Save the file.
Adapting the Test Case
Next, we create the test case corresponding to this specification as a new file CreateHero_parameterized.tcl. You can follow the same steps as described in the tutorial on which this one is based on. Alternatively, you could create the file by copying the CreateHero.tcl file, in the same manner as we did with the specification file. In that case, you will have to adapt the implements statement in the first line, as well as the specification steps.
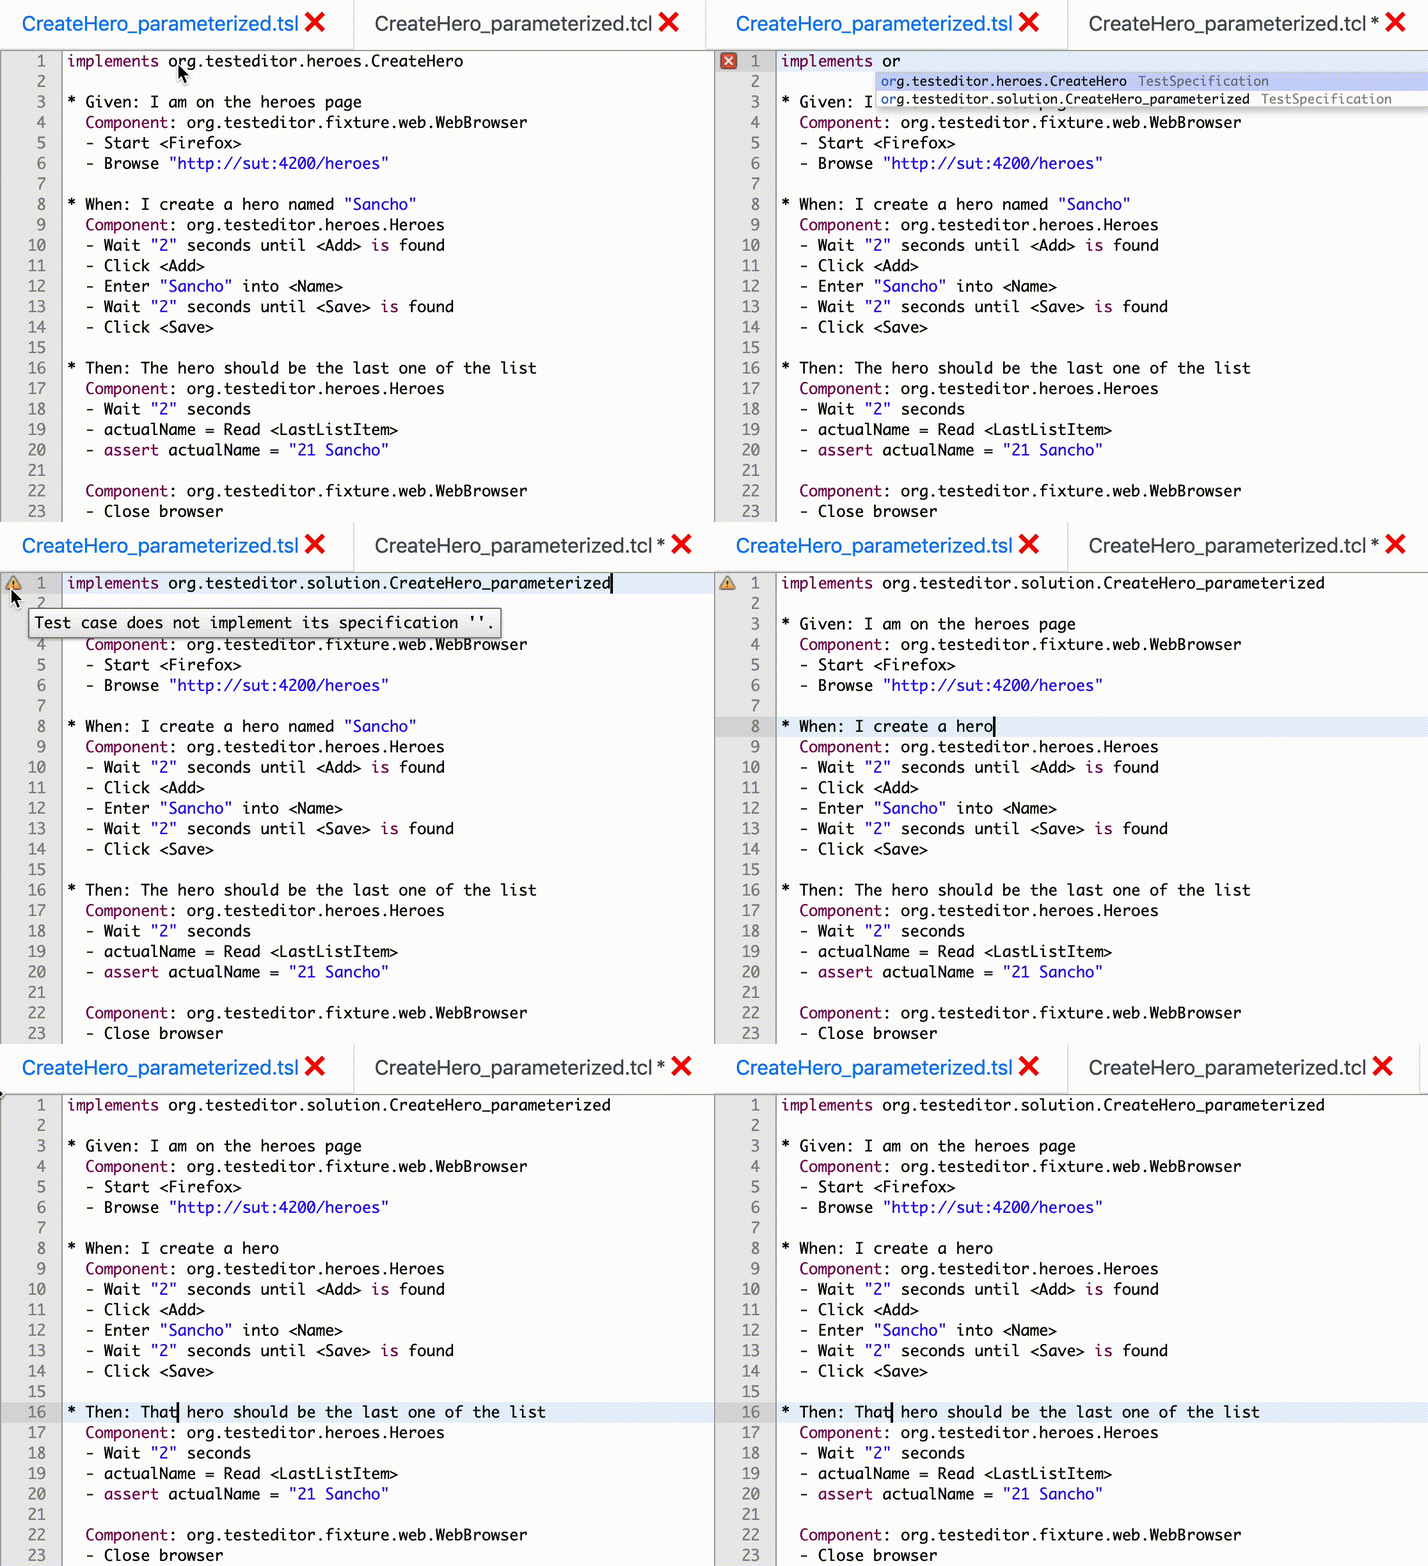
Remember that you can leverage the Test-Editor’s features like context assist and validation markers to help you along. For example, remove the old reference to the test specification in the first line and use the former feature by hitting
STRG+SPACEto select the newly created specification from a list. The latter feature will then make a warning marker appear, indicating that the test case does not match the specification. It will guide you to make the necessary changes to the specification steps, disappearing once all of them match those in the test specification exactly.
Introducing Test Data
Now, let’s make this a test case a simple, parameterized one. To do so, we first add a data block:
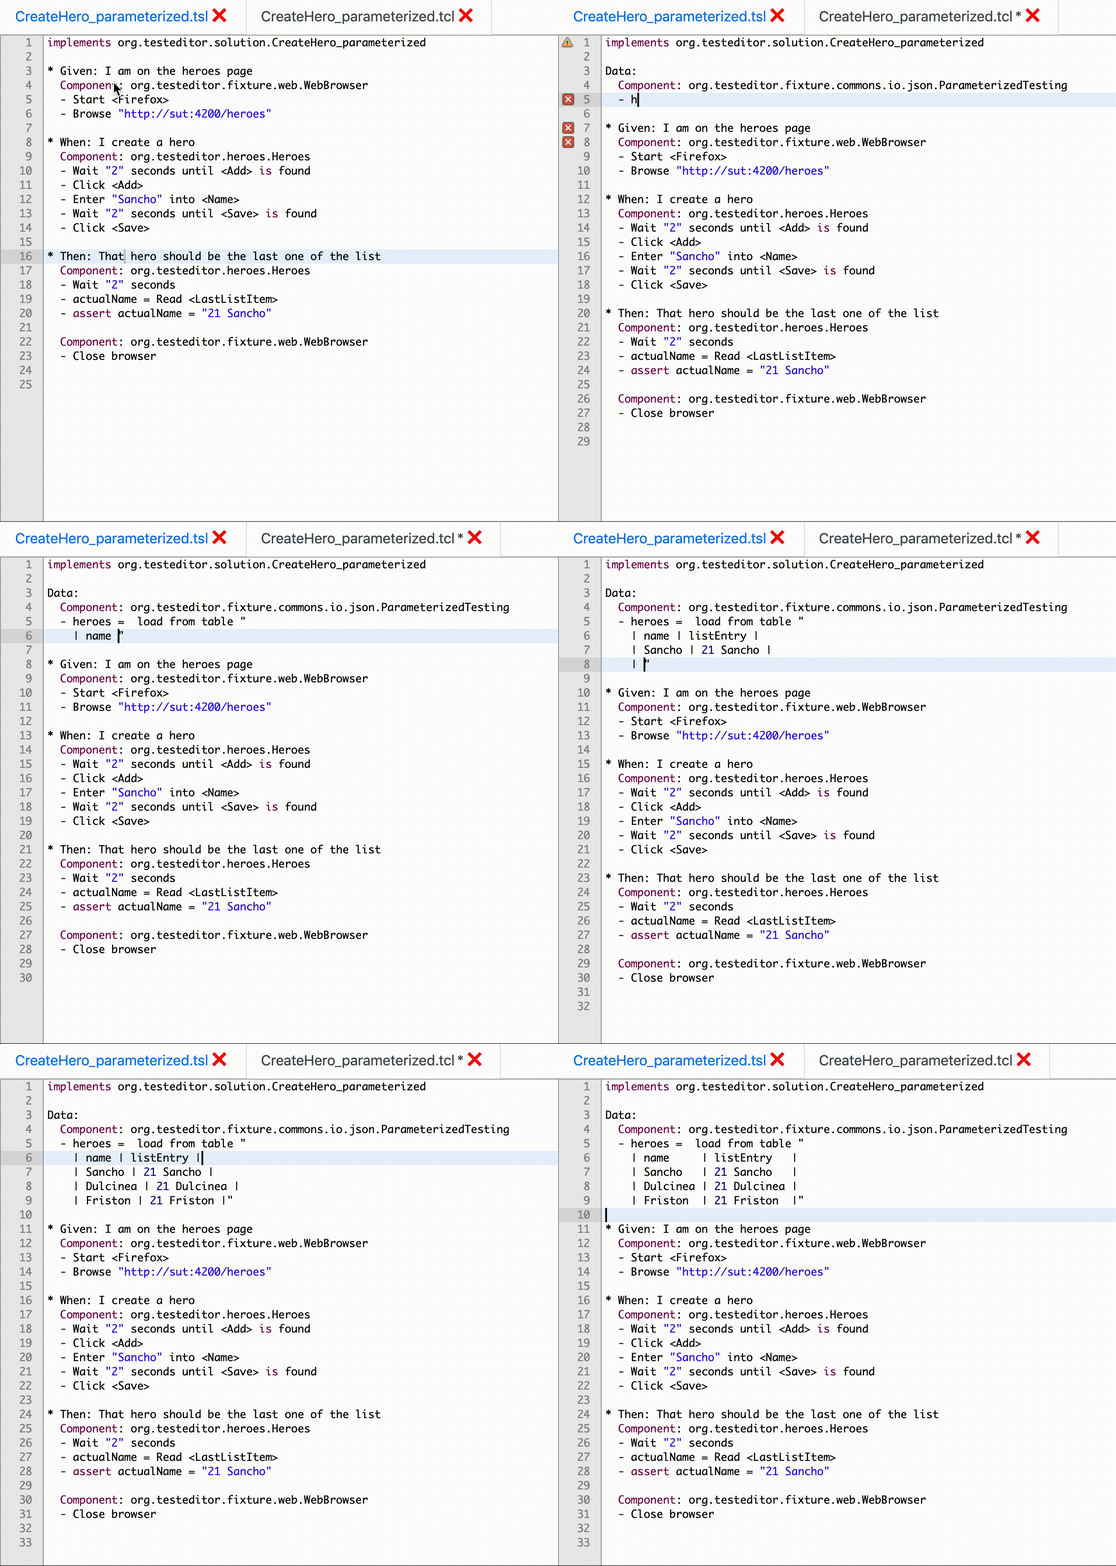
As shown in the screencast, a data block goes into the preamble of a test case, i.e. before any specification and test steps. Its syntactical elements should be familiar, though: first, you choose a component, just like you would when defining test steps. Here, we use the ParameterizedTesting component, which gives us access to different sources of data. Next, we have an assignment, introduced with a dash, just like test steps are. We define a variable heroes that will contain our test data. Hitting STRG + SPACE once more, we get a list of available loading steps: we can load data from external files in CSV, JSON, and YAML format.

ParameterizedTestingis a standard component and part of the Test-Editor. This is extensible, though, and the developer team of your application may choose to provide you with a custom component for loading testing parameters.
Probably not suited for larger data sets, but perfect for this initial, simple example, is another loading step that allows us to get our data from a table which we type out right here in our test case file. A pipe symbol (|) is used to delimit columns, and each row goes into a separate line. The entire table is a parameter to the data loading step, so it is enclosed in double quotes. You already know this notation for parameters: it works exactly the same as in other test steps, e.g. Wait "2" seconds. Only now, the parameter is an entire table that spans multiple lines!
The test data itself, as defined by our table, is structured as follows: we have two columns, the first contains the name of the hero we are going to add, and the second column contains the content of the list entry we expect to see after adding the hero. This is just the hero’s name prefixed with its index number in the list. With this data, our test will be executed once for every row in the table.
The test are (and should be) isolated from each other, i.e. each iteration starts the test scenario from scratch. Therefore, we expect every hero to be the 21st in the list – previous test runs will not have an effect on later ones.
Using the Test Data
If we’d run our test now, it would be executed three times – once for every row in our test data. However, our test scenario will still be the same every time, as we do not actually use the data. To change that, we make two more modifications to our test case:
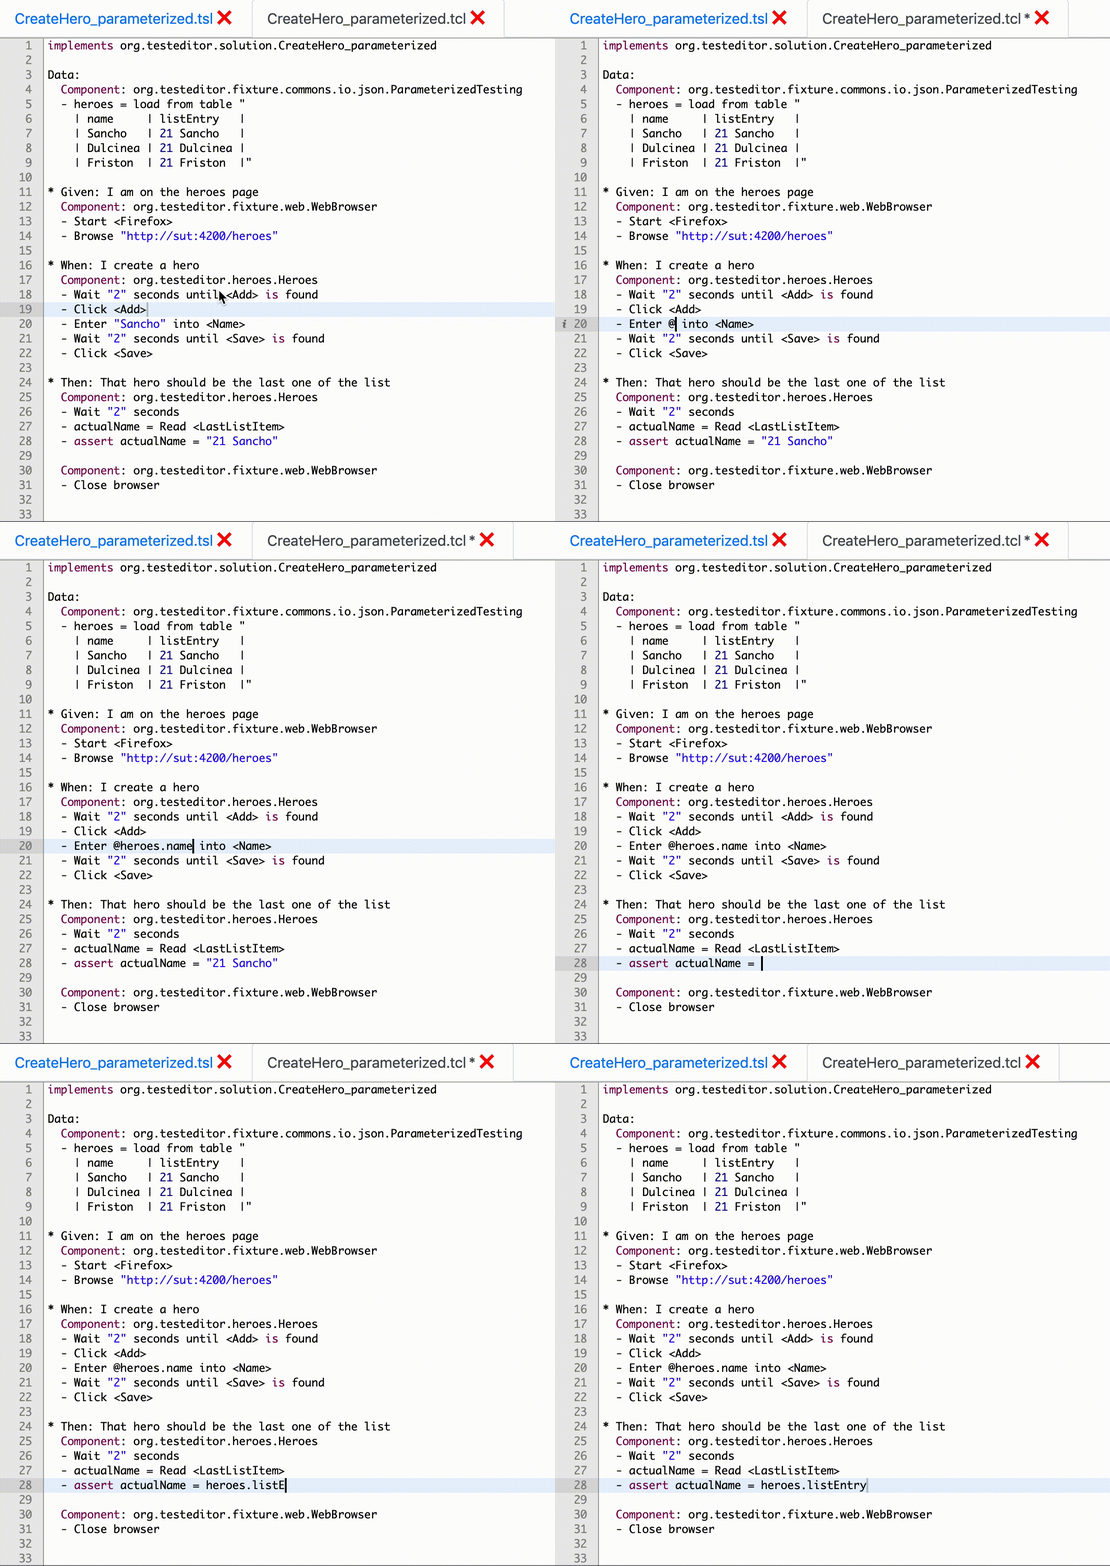
Instead of entering the name “Sancho” every time, we now use our heroes variable to retrieve the name to enter into the field from our test data. Instead of the fixed value enclosed in double quotes, we use the @-symbol to indicate that we want to use a variable. As usual, STRG + SPACE will assist you by providing a list of available variables. To refer to a particular column, we use that column’s name as defined in the header of our table, and append it to the heroes variable, separated with a dot. We end up with @heroes.name – when the test is run, this will be replaced by the value in our table, in the row corresponding to the current test execution iteration.
Further down in our test case, we also modify our expectation regarding the last entry in the list of heroes after adding a new one. As before, we replace the fixed value with a reference to the heroes variable. In an assert statement like this, we can forego the @-symbol and just type the variable (or choose it from the list provided by content assist). We need to compare the actual value present on the heroes page with the value in our data table’s second column, so we write heroes.listEntry.
And that’s it! You have created your first parameterized test case with the Test-Editor. Read on to learn how test execution results are presented for parameterized tests, and how to format data in external files to be loaded by the Test-Editor’s ParameterizedTesting component.
If you need to refer to your test data in many places within your test case, you do not have to repeat the name of the data variable every time. Instead, you can define a list of fields in your data block that you want to be able to access directly. Just modify your data block to start with
Data: name, listEntry. Now, instead ofheroes.nameandheroes.listEntry, you can simply writenameandlistEntry, respectively. Note that when referring to your test data from within a test step, you will still have to use the@-symbol as a prefix.
Test Result Presentation
Running a parameterized test works just the same as running a regular test case – only now, it will automatically be executed once for every row in the test data. In the test execution navigator, it looks like this:
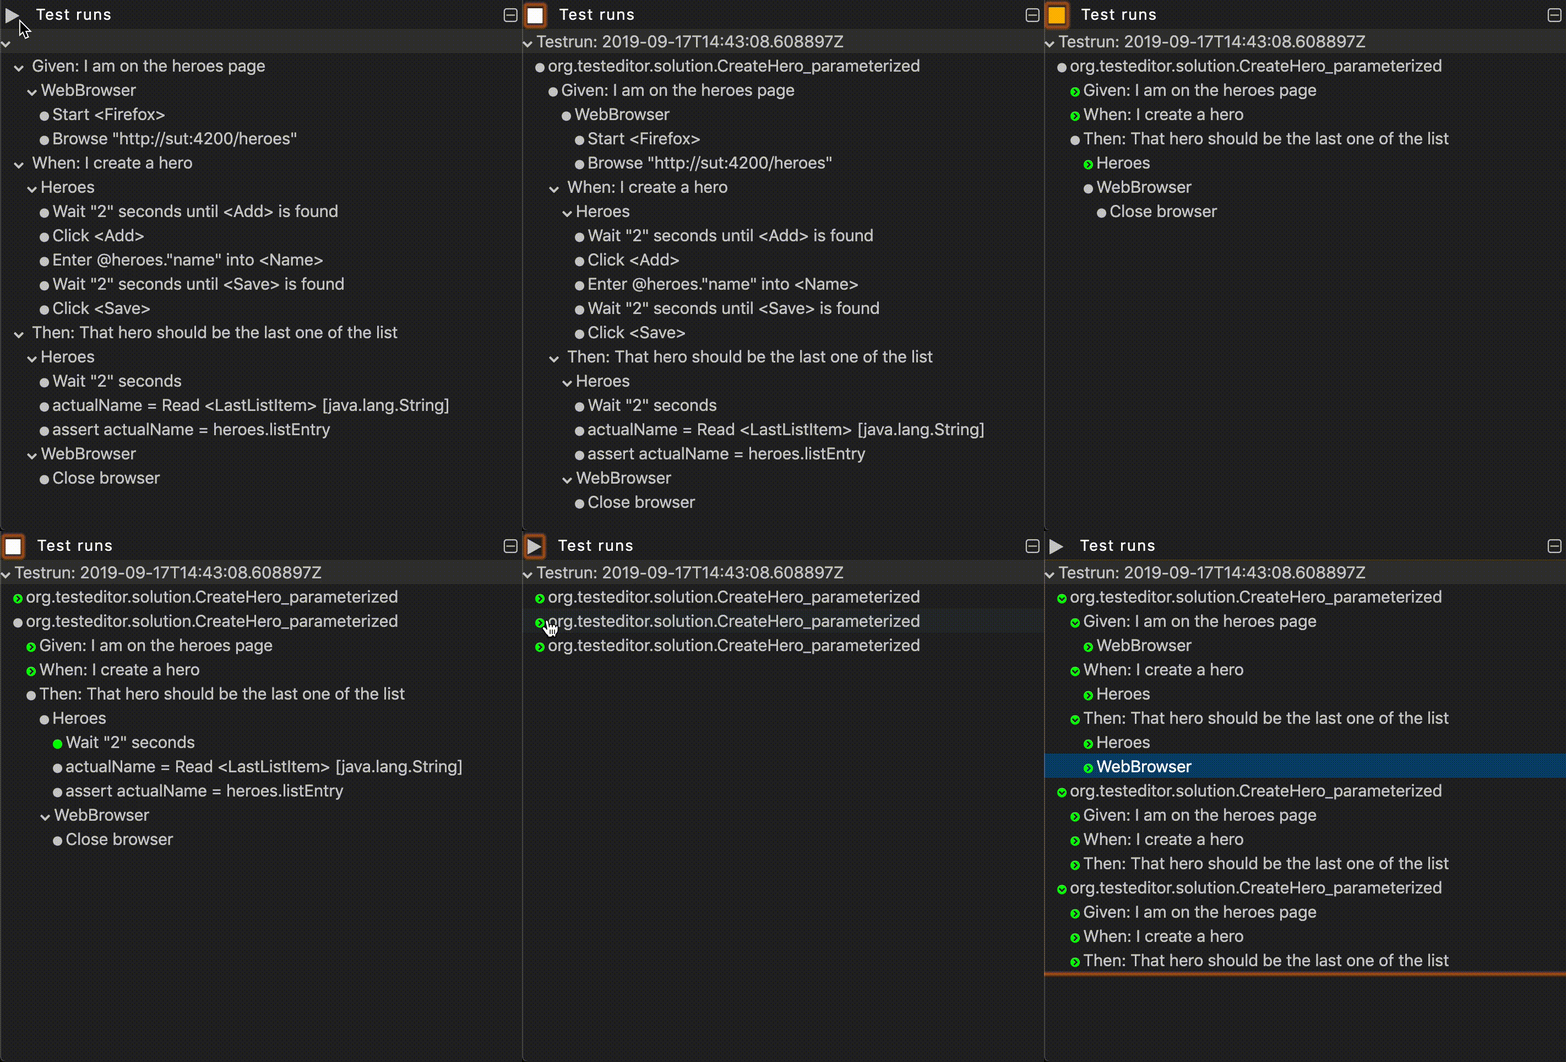
As you can see, each run through the test adds a new sub-tree to the result view. The results are organized in the same order as the rows in the test data. In large data sets, you can always look out for preVariables and postVariables in the test execution details view.
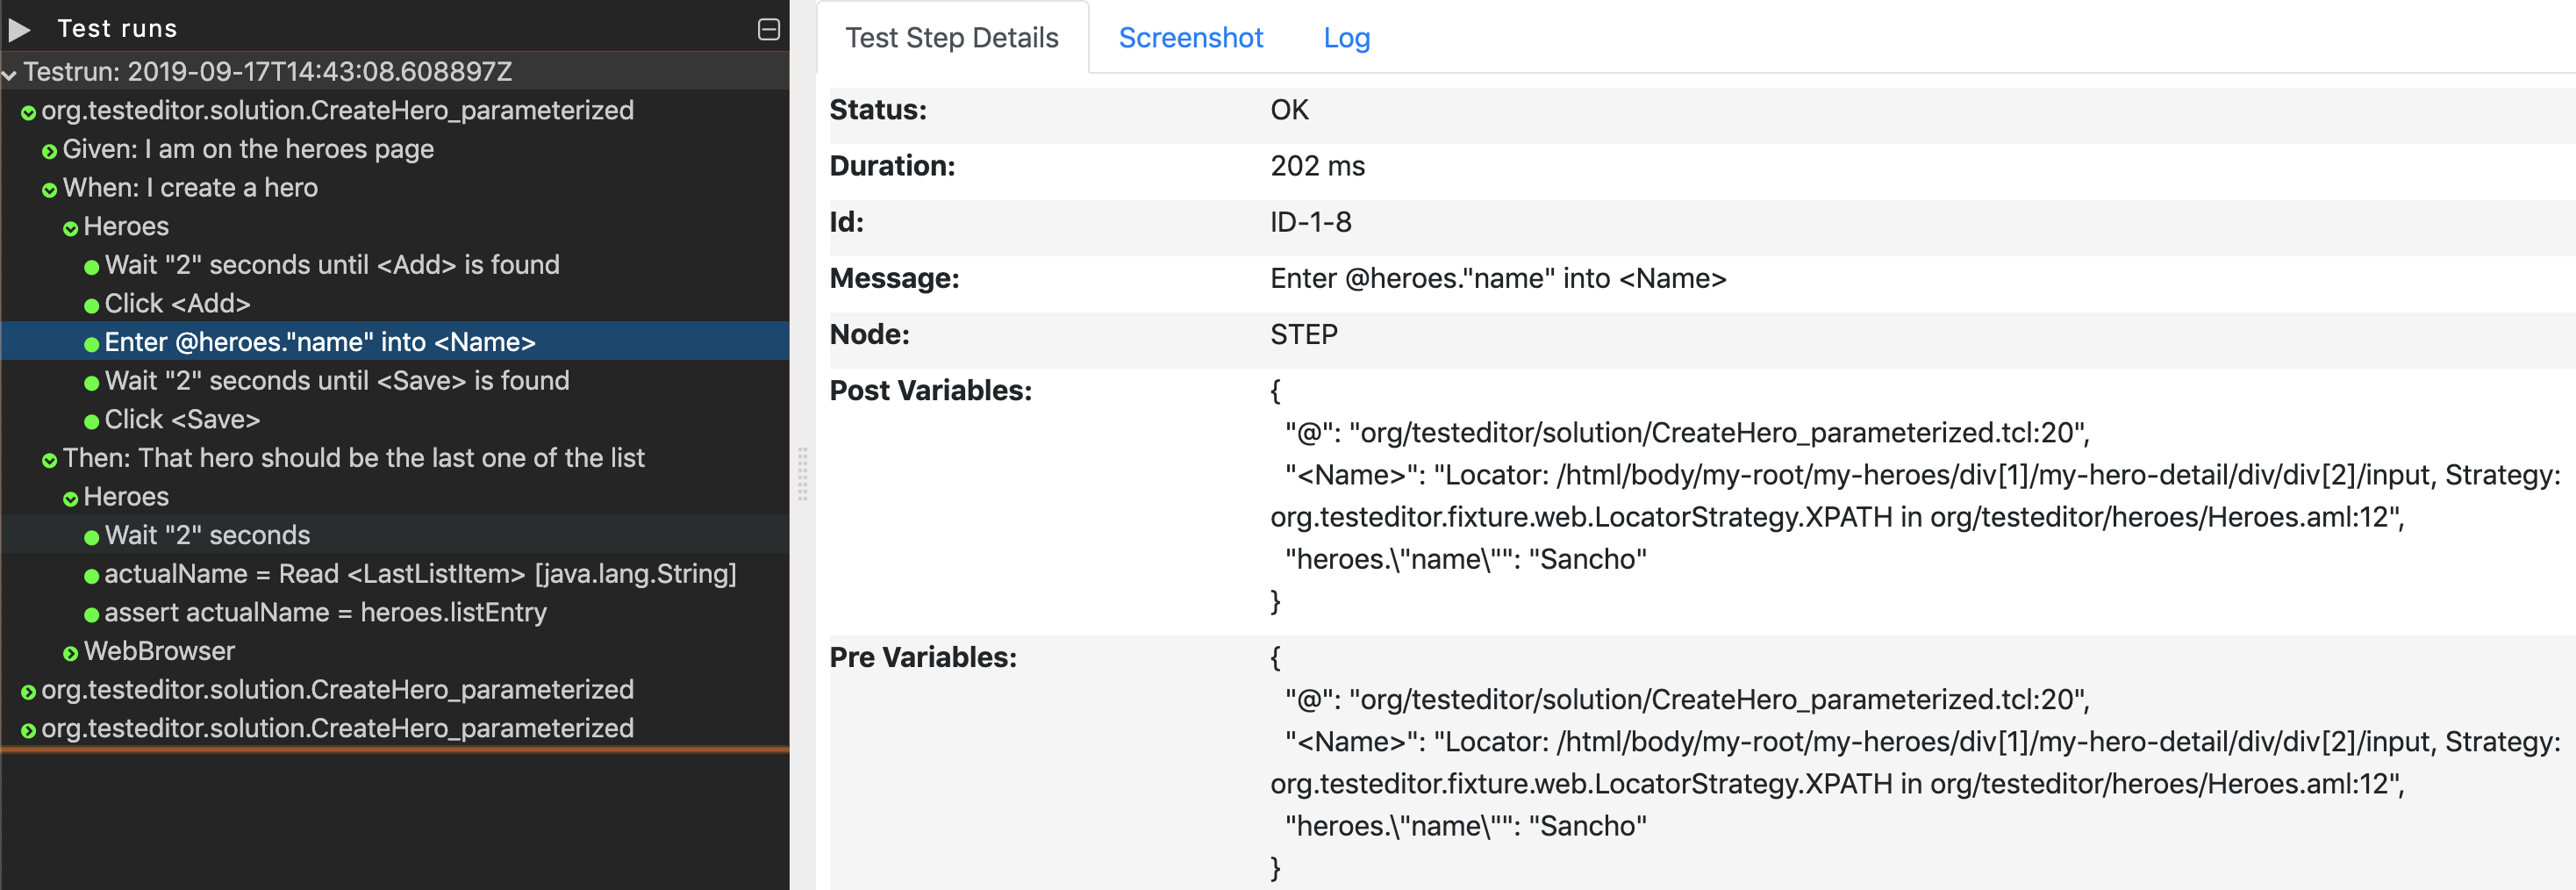
Here, you’ll find the actual values used for any variables relevant to a particular test steps. This should make it easier to track down the test data values responsible for assertion errors. Of course, if there are failing assertions or other errors in test steps, those steps will be marked red in the test execution navigator as usual. Therefore, you should never have to sift through all the test steps of all the iterations through your test data, and instead can always navigate directly to the problematic test steps.
Loading Test Data from External Files
For demonstration purposes, we used a table defined right in our test case file to load test data from. However, your test data might consist of much more columns and rows, which would distract from the actual test scenario and make the test case quite unwieldy. Also, you might want to use the same data in multiple test cases. You do not want to copy and paste the data to every test case file, because should you ever have to modify the data, you’d have to make the same modifications in every on of those files.
A better solution is to store the data separately from the test case. The Test-Editor provides means to load data from CSV, JSON, and YAML files. Many applications you might be using to edit and manage your data will let you export into one of these formats. Excel spreadsheets, for example, are easily exported to CSV (“comma-separated values”). If you cannot convert your data into one of those files, you or the development team responsible for the application under test may be able to provide a custom component to load your data into the Test-Editor.
Loading Data from CSV Files
CSV files are very similar to the data table format we have seen in the tutorial. Here is the tutorial’s example data in CSV format:
name;listEntry
Sancho;21 Sancho
Dulcinea;21 Dulcinea
Friston;21 Friston
Notice that, despite the name comma-separated values, the Test-Editor expects a semicolon as the symbol separating values.
All the supported data file types can be created and edited right in the Test-Editor1! So, go ahead and create a new file called heroes.csv, and fill in the data as shown above. Then, to load this data, modify the data block of your test case to this:
Data:
  Component: org.testeditor.fixture.commons.io.json.ParameterizedTesting
  - heroes = load from CSV file "org/testeditor/heroes/heroes.csv"
The path to the data file is always relative to the workspace, not relative to where your test case file is stored. So, this example assumes that there is a directory at the workspace root called org, containing a directory testeditor, containing a directory heroes, which in turn contains our csv file, named heroes.csv.
You can run the test now, and it should work exactly like before when we used a data table inside the test case file itself.
Loading Data from JSON and YAML Files
Both JSON and YAML files allow for a hierarchical structure of the contained data, that can be useful for more complex test data. The two formats allow to model basically the same kinds of structures, just with different notations. To load data in these formats, the ParameterizedTesting component offers corresponding data loading steps, e.g. load from JSON file "org/testeditor/heroes/heroes.json" and load from YAML file "org/testeditor/heroes/heroes.yaml".
This is how you can express the data we have been using throughout this tutorial as JSON:
[
	{ "name": "Sancho", "listEntry": "21 Sancho" },
	{ "name": "Dulcinea", "listEntry": "21 Dulcinea" },
	{ "name": "Friston", "listEntry": "21 Friston" }
]
And the same in YAML format:
- name: Sancho
  listEntry: 21 Sancho
- name: Dulcinea
  listEntry: 21 Dulcinea
- name: Friston
  listEntry: 21 Friston
While both formats are more verbose than CSV, you can use it to define nested data structures, as well as collections of data. Let’s assume our application would also allow us to store a list of character traits with each hero, as well as an animal companion. Taking our hero Sancho as an example, here is how we could model this in both JSON and YAML format:
{
    "name":"Sancho",
    "listEntry":"21 Sancho",
    "traits":[
        "simpleminded",
        "faithful",
        "lazy"
    ],
    "companion":{
        "name":"Dapple",
        "species":"Donkey"
    }
}
name: Sancho
listEntry: 21 Sancho
traits:
- simpleminded
- faithful
- lazy
companion:
  name: Dapple
  species: Donkey
To use this data, you can refer to it in the Test-Editor: to navigate nesting hierarchies, a dot is used, and to refer to an entry in a list of values, an index number in square brackets is used. For example, assuming our test data variable is heroes, heroes.companion.species will be replaced with “Donkey” in the test case. Lists of values are enumerated starting from zero, so to access the Sancho’s second trait, “faithful”, you’d use heroes.traits[1].
-
A note for developers: for the tests to be able to find the test data files, they must be on the classpath. This can be configured in the workspace’s
build.gradlefile like so:processResources { from ('src/test/java') { include '**/*.csv' include '**/*.json' include '**/*.yaml' } }